WSO2 DAS – Spark Cluster tuning…

Cont’d from the previous blog post

As mentioned earlier, WSO2 DAS embeds Spark, and by default a Spark cluster is created inside  a DAS cluster. In this post, we will look at how we could configure the nodes, to get the best out of the DAS analytics cluster.

For more information about how clustering is done in DAS, please refer the DAS Clustering Guide.

DAS Cluster – Explained…

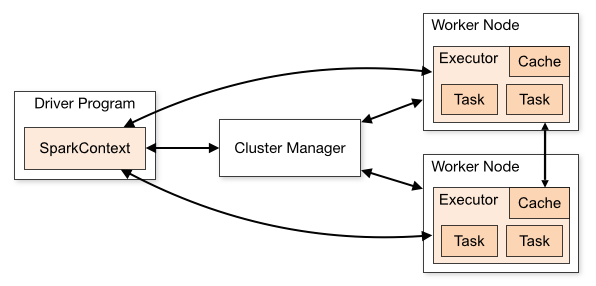
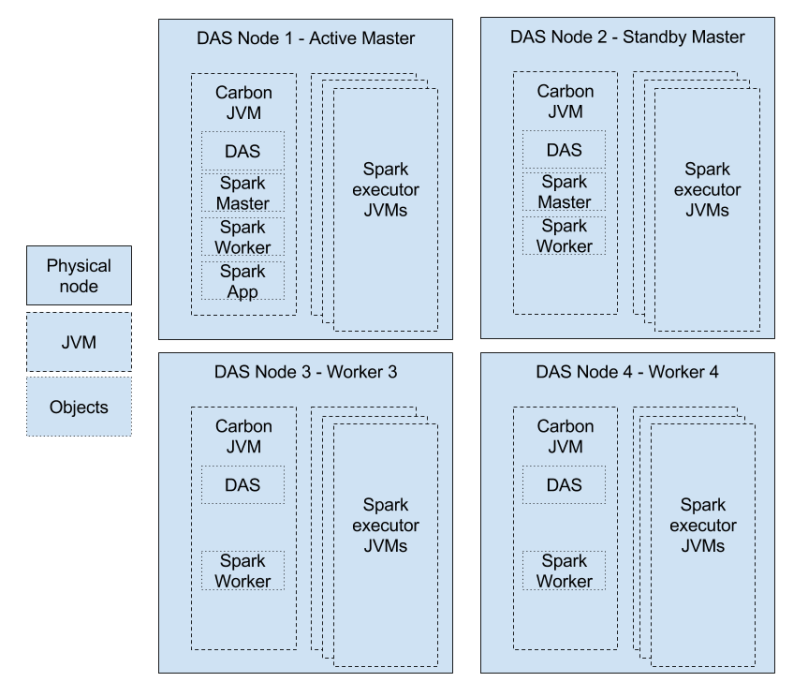
A typical DAS cluster can be depicted as follows.

image2015-8-2020143a413a7

In this setup, the Spark cluster resides in the “Analyzer sub cluster”. It will be responsible for instantiating the masters, workers and the driver application.

The main configurations of the DAS cluster is governed by the <DAS home>/repository/conf/analytics/spark/spark-defaults.conf file. The default content of this file is as follows.


# ------------------------------------------------------
# CARBON RELATED SPARK PROPERTIES
# ------------------------------------------------------
carbon.spark.master local
carbon.spark.master.count 1
carbon.spark.results.limit 1000
carbon.scheduler.pool carbon-pool

# ------------------------------------------------------
# SPARK PROPERTIES
# ------------------------------------------------------

# Application Properties
spark.app.name CarbonAnalytics
spark.driver.cores 1
spark.driver.memory 512m
spark.executor.memory 512m

# Runtime Environment

# Spark UI
spark.ui.port 4040
spark.history.ui.port 18080

# Compression and Serialization
spark.serializer org.apache.spark.serializer.KryoSerializer
spark.kryoserializer.buffer 256k
spark.kryoserializer.buffer.max 256m

# Execution Behavior

# Networking
spark.blockManager.port 12000
spark.broadcast.port 12500
spark.driver.port 13000
spark.executor.port 13500
spark.fileserver.port 14000
spark.replClassServer.port 14500

# Scheduling
spark.scheduler.mode FAIR

# Dynamic Allocation

# Security

# Encryption

# Standalone Cluster Configs
spark.deploy.recoveryMode CUSTOM
spark.deploy.recoveryMode.factory org.wso2.carbon.analytics.spark.core.deploy.AnalyticsRecoveryModeFactory

# Master
spark.master.port 7077
spark.master.rest.port 6066
spark.master.webui.port 8081

# Worker
spark.worker.cores 1
spark.worker.memory 1g
spark.worker.dir work
spark.worker.port 11000
spark.worker.webui.port 11500

# Spark Logging

# To allow event logging for spark you need to uncomment
# the line spark.eventlog.log true and set the directory in which the
# logs will be stored.

# spark.eventLog.enabled true
# spark.eventLog.dir &amp;amp;amp;amp;amp;amp;amp;amp;lt;PATH_FOR_SPARK_EVENT_LOGS&amp;amp;amp;amp;amp;amp;amp;amp;gt;

There are 2 sections

  • Carbon related configurations

These are carbon specific properties when running Spark in the Carbon environment and they start with the prefix “carbon.”

  • Spark configurations

These are the default properties shipped by Spark. Please refer this for Spark environment variables.


I will explain the uses of these configuration as I explain the setup of a Spark Cluster.

DAS Spark Clustering approach

DAS Spark cluster is controlled by the carbon clustering and a sub-cluster abstraction. This sub-cluster has enabled DAS to create a subset of members in its carbon cluster. These subsets are being used for DAS analytics cluster as well as the indexing cluster.

Default setup

In the vanilla DAS pack, Spark would start in the “local” mode. Refer this.

Single node setup

In the single node setup, the DAS server will instantiate a master, a worker and a spark app all in a single node. To enable this, you would have to enable carbon clustering in axis2.xml file and leave ‘carbon.spark.master local’ as it is.

Multi node setup

This will be an extension to the single node setup. A multi-node setup is used to achieve high availability (HA) in the DAS analytics cluster. In addition to single node setup configs, ‘carbon.spark.master.count’ becomes an important property in this setup. carbon.spark.master.count specifies the number of masters which should be available in the analytic cluster.

In a multiple master setup, there will be one active master and the rest will be standby. The active master will be responsible for distributing the resources among the executors.

Once the carbon.spark.master.count is reached, each member of the analytics cluster, would start a worker pointing to a list of available masters (both active and standby).

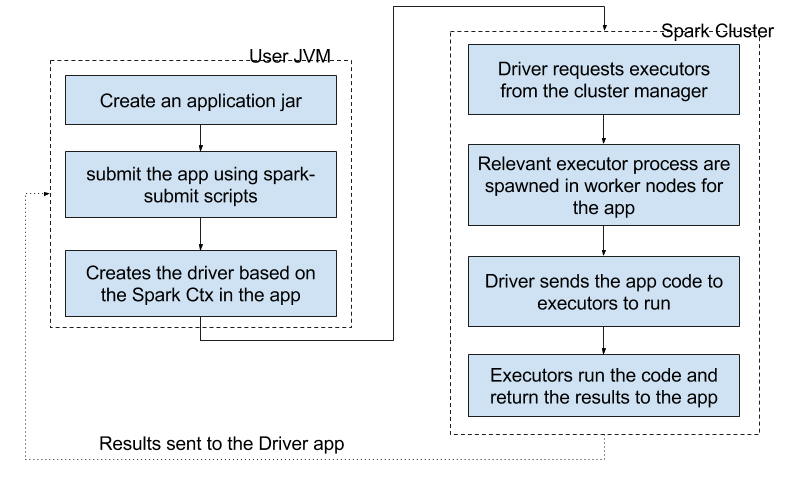
Once the masters and the workers are instantiated, the Spark cluster configuration completes. Then a spark application will be spawned in the analytic cluster leader.

This setup can handle master and/or worker fail overs. Let us talk in detail about this in another blog post.

Resource tuning of DAS analytic nodes

In a DAS production environment, it is important to allocate the resources correctly to each node, in order to achieve optimum performance.

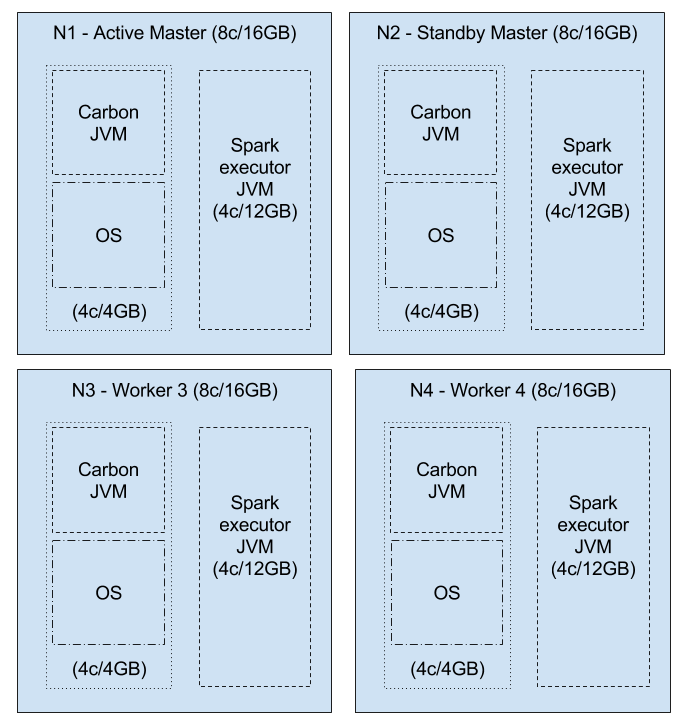
Let us first look at a typical multi node DAS setup, to understand how the resources should be allocated.

das muti node setup


As you could see here, the resources of the cluster need to be distributed among these components depending on the requirement.

Main configuration parameters

There are several important configuration parameters. Resources are mainly revolve around the number of cores available and memory available. (Note that DAS is using the Standalone cluster mode)

Parameter Default value Comment
Cores
spark.executor.cores All the available cores on the worker The number of cores to use on each executor. Setting this parameter allows an application to run multiple executors on the same worker, provided that there are enough cores on that worker. Otherwise, only one executor per application will run on each worker.
spark.cores.max Int.MAX_VALUE The maximum amount of CPU cores to request for the application from across the cluster (not from each machine)
spark.worker.cores 1 The number of cores assigned for a worker.
Memory
spark.worker.memory 1g Amount of memory to use per worker, in the same format as JVM memory strings (e.g.512m, 2g).
spark.executor.memory 512m Amount of memory to use per executor process, in the same format as JVM memory strings (e.g.512m, 2g).

So, the number of executors in a single worker for the carbon-application can be derived from,

number of executors in a single worker

= FLOOR ( MIN (spark.worker.cores, spark.cores.max) / spark.executor.cores )

Then the amount of memory which should be allocated for a worker should be,

spark.worker.memory ≥ spark.executor.memory ×  number of executors

Configuration patterns

By setting different values for each of the parameters above, we can have different configuration patterns.

Let’s take an AWS m4.xlarge instance for an example. It has 8 vCPUs and 16 GB memory. If we allocate 4 GB and 4 cores to the OS and the Carbon JVM (by default this only takes 1GB memory), then we can allocate spark.worker.memory = 12g and spark.worker.cores = 4.

Single executor workers

If we do not specify spark.cores.max or spark.executor.cores then, all the available cores will be taken up by one executor.

Executors = min (4,Int.MAX_VALUE)/4 = 1

So, we could allocate all the memory for that executor, i.e. spark.executor.memory=12g

das single executor .png

NOTE: Having large amount of memory for a single JVM is not advisable, due to GC performance.

Multiple executor workers

Let’s say, we  specify spark.executor.cores = 1

Then executors = min (4, Int.MAX_VALUE) / 1 = 4

Therefore, we could allocate 12GB/4 = 3GB per executor

das multi executor .png

Resource limited workers

We can limit the number of cores used for the carbon application cluster-wide by setting the  spark.cores.max value.

Let’s set  spark.cores.max = 3 per node x 4 nodes = 12. Then, there is an excess of 4 cores, which can be used by some other application.

Let’s take the above multiple executor setup.

das limited executor .png

Here, there are is resources for 16 executors with 16 cores and 48GB of memory. With the spark.cores.max = 12 (i.e. 3 x 4), 12 executors will be assigned to the carbon application and the rest of the cores and memory can be assigned for another spark application, i.e. 4 cores and 12 GB will be available in the cluster, which can be used by the application, depending on its preference.


So, as depicted above, depending on the requirement and resources available, you should distribute the cores and memory among the workers.

Cheers


Dynamics of a Spark Cluster WRT WSO2 DAS…

WSO2 DAS (Data Analytics Server) v3.0.1 was released last week and it is important for us to understand how a DAS cluster operates.

It employs Apache Spark 1.4.2.wso2v1 (this will be upgraded to the latest Spark version in the upcoming DAS 3.1.0 release, scheduled for 2016). DAS 3.0.1 uses Spark Standalone mode cluster manager, and uses its underlying Carbon clustering (powered by Hazelcast) for managing the cluster.

Understanding a Spark cluster

WSO2 DAS embeds Spark, and creates a Spark cluster on its own. So, it is imperative to understand the dynamics of a Spark cluster.

As per the Spark docs, following figure depicts a standard cluster

cluster-overview

These are the key elements of a Spark cluster (Referring to the Spark glossary).

Driver – A separate java process spawn when creating a SparkContext (SC) object. (NOTE: As per the current implementation, only one SC object can be present in a single JVM). It is the main() function of an application.

Cluster manager – This manages the resources of a cluster. There are several cluster managers available for Spark, and DAS uses the “Standalone cluster manager”

Worker – Any node that can run application code in the cluster

Executor – A process launched for an application on a worker node, that runs tasks and keeps data in memory or disk storage across them. Each application has its own executors.

How is an application submitted to Spark

The default way of submitting an application to a Spark cluster is, by using the provided spark-submit scripts. The process can be depicted as follows.


spark app submission process.png

Essentially there are several java processes spawning in order to achieve this.

  • Driver process (in the spark-submit running JVM)
  • Spark cluster manager (already running)
  • Executor processes in the worker node


spark jvms

So, when you create the application, you have to instruct the spark-submit scripts about how much memory, cores etc to be used for the driver process. These are governed by parameters such as spark.driver.cores, spark.driver.memory, etc in the SparkConf object (can be given when running the script as well).

The configurations for controlling the executor processes can be set using the parameters in SparkConf of the application. The configuration params can be found here.

Application submission process inside DAS

DAS has embedded Spark, and in the process, we have changed the application submission process. DAS does not need any application submission, instead, it creates a SparkContext when the server starts up (similar to Spark REPL).

In the DAS server startup, it creates a Spark cluster using Carbon clustering and creates a driver application (named “CarbonAnalytics” by default) in the running JVM, pointing to Spark cluster it has already created. Then the users can submit their SQL queries to the CarbonAnalytics app.

So essentially, in DAS the users can only submit SQL queries to the DAS-Spark cluster, not an application jar.

Jobs, Stages and Tasks

A Spark job consist of several stages. Each stage has several tasks. A task is a single unit of work sent to the executor.

spark jobs

Spark doc definitions are as follows

Job – A parallel computation consisting of multiple tasks that gets spawned in response to a Spark action (e.g. save, collect); you’ll see this term used in the driver’s logs.

Stage – Each job gets divided into smaller sets of tasks called stages that depend on each other (similar to the map and reduce stages in MapReduce); you’ll see this term used in the driver’s logs.

Tuning up JVMs

Since the process involves spawning several JVMs, it is important for us to understand how to tune these JVMs. Let us discuss this in the next post

Cheers

Using Spark Datasources API

In this post, let us take a look at how Apache Spark Datasources API, its concepts and how it can be implemented using an example from the WSO2 DAS.

Datasources API

Spark Datasources API is an important extension point in Apache Spark and Spark SQL. It allows users to link a Dataframe to a variety of datasources. A Dataframe is an extension of a RDD with a schema attached to it. This allows users to query the underlying datasource using SQL (Spark SQL specifically).

Here, we will discuss the concepts and motivation behind the API, followed by a concrete implementation of the interfaces in the Java environment.

API Code and Concepts 

You can find the code for the API in the ####org.apache.spark.sql.sources package. Here, the extension points can be found with the annotation @DeveloperAPI. interfaces.scala has all the traits required in the API.

Rather than discussing the traits in the interfaces.scala file, let us go through the code, linking it with concepts behind the API.

How datasources are connected to an RDD 

For Spark Core requires an RDD object to perform any computation on data and Spark SQL needs a schema around an RDD so that it could link it to a Dataframe.

This process starts by creating a “Relation” and a “Scan”.

Let us look at this in a little more detail.

BaseRelation 

This is the abstract class, which specifies the schema of the Dataframe. Classes which extend this, should be able to implement a method to return the schema as a StructType. Please find the code here.


@DeveloperApi
abstract class BaseRelation {
 def sqlContext: SQLContext
 def schema: StructType

 def sizeInBytes: Long = sqlContext.conf.defaultSizeInBytes

 def needConversion: Boolean = true
}

As you could see here, it has two methods sqlContext and schema, which needs to be taken at the extension of this abstract class (by using the constructor).

TableScan, PrunedScan, PrunedFilteredScan

These traits (similar to an interface in Java) are responsible in creating the RDD from the underlying datasource. You can find the code here. For an example, TableScan & PrunedScan looks like this


@DeveloperApi
trait TableScan {
 def buildScan(): RDD[Row]
}

@DeveloperApi
trait PrunedScan {
 def buildScan(requiredColumns: Array[String]): RDD[Row]
}

A further clarification, as you could see here, buildScan method in the TableScan is used to create a table (RDD) while pruned scan creates the RDD from the given columns.

So, as I mentioned earlier, a custom relation should implement this BaseRelation and one or more of these scans. This fulfills requirements of a schema and an RDD for Spark runtime to create a Dataframe.

RelationProvider, SchemaRelationProvider, CreatableRelationProvider

Once we have a concrete relation implementation, we are in a position to create a relation from a ‘CREATE TEMPORARY TABLE’ query. This is done by implementing the RelationProvider trait.

trait RelationProvider {

 def createRelation(sqlContext: SQLContext, parameters: Map[String, String]): BaseRelation
}

CREATE TEMPORARY TABLE query syntax looks like this

create temporary table [table name] using [relation provider class] options ([parameters]);  

Therefore, when you run this query in Spark SQL, it would send a map of parameters and the SQL context object to the given relation class (which should implement the RelationProvider trait) so that it could create a BaseRelation

InsertableRelation

So far, we discussed relations and relation providers to scan a table. InsertableRelation is where you could push data into a given data source. Find the code here.

@DeveloperApi
trait InsertableRelation {
 def insert(data: DataFrame, overwrite: Boolean): Unit
}

This InsertableRelation is coupled with the INSERT INTO/OVERWRITE TABLE queries. When you run such a query, the resultant dataframe of the query will be passed on to this relation, together with a boolean flag which indicates if it requires overwriting.

An overview of the API is depicted in the following image

spark datasources API

We saw here now, that Spark Datasources API provides a very simple set of APIs which could be used to connect Spark to an outside data source.

In the next post I will explain to you how WSO2 DAS used this API to connect to the DAS Data Access Layer. The above concepts will be much more clear when you see the implementation.

best!

Iterate through a Spark DataFrame using its partitions in Java

My work at WSO2 Inc mainly revolves around the Business Activity Monitor (BAM)/ Data Analytics Server (DAS). For the DAS 3.0 release, we are bringing in Apache Spark as the analytics engine to the WSO2 Carbon Platform replacing Apache Hadoop and Apache Hive. I am working on this Spark migration. Spark introduces an interesting concept of RDDs to the analytics community. I am not going go into details about the RDDs. Please click here for further information. Once an RDD is created in the Spark “world”, it can be used for data manipulation/ analysis etc.

SparkSQL the SQL query engine for Spark, uses an extension of this RDD called, DataFrame, formerly called a SchemaRDD. For further information, click here.

Here I will be discussing how to use the partitions of a DataFrame to iterate through the underlying data… and some useful debugging tips in the Java environment. (Thought this was useful because, Spark is written in Scala, hence almost all of its features heavily use Scala functionalities… and when we bring it to the Java env, things might not work as expected!)

DataFrames… WTH?

As per Spark,

A DataFrame is a distributed collection of data organized into named columns. It is conceptually equivalent to a table in a relational database or a data frame in R/Python, but with richer optimizations under the hood. DataFrames can be constructed from a wide array of sources such as: structured data files, tables in Hive, external databases, or existing RDDs.

Problem: How to retrieve data? Take all the elements?

A DataFrame (DF) encapsulates data in Rows and we can retrieve these Rows as a list or as an array, using the following collect methods in a DF.

def collect(): Array[Row]
def collectAsList(): java.util.List[Row]

But the problem here is, a ‘collect’ method collects all the data under a DF (in RDD jargon, it is an action op). Since Spark uses in-memory processing, if this DF covers a large data set, the collect operation will be inefficient.

Solution: Take data using Partitions!

Using underlying partitions of a DF gives a better solution for this!

def foreachPartition(f: Iterator[Row] => Unit): Unit

As you could see in the method signature, it takes function as the method parameter, and this function takes a Row Iterator and returns a Unit. So here, it would not collect all the data under the DF at once!

Example:

val b = sc.parallelize(List(1, 2, 3, 4, 5, 6, 7, 8, 9), 3)
b.foreachPartition(x => println(x.reduce(_ + _))) 

From Scala to Java… 

This looks fairly straightforward in Scala, but when is comes to Java, things are a little ‘messy’! There we would have to implement the Scala ‘anonymous function‘ .

In WSO2 DAS we have implemented this in our implementation of Spark BaseRelation.

data.foreachPartition(new AbstractFunction1<Iterator<Row>, BoxedUnit>(){
 @Override
 public BoxedUnit apply(Iterator<Row> v1) {
// your logic goes here... 
 return BoxedUnit.UNIT;
 }
 });

Here we have implemented the scala.Function1 using scala.runtime.AbstractFunction1. BoxedUnit here is equivalent to a void result in Java.

Troubleshooting tips….

  • One important thing to note here is that, in a distributed environment, this anonymous function will be serialized to all Spark Workers.
  • All non-serializing objects should be instantiated within the

Houston, We’ve Got a Problem!

BUT in the real DAS implementation, we came across the following exception…

org.apache.spark.SparkException: Job aborted due to stage failure: Task not serializable: java.io.NotSerializableException: ...

It turns out that when we implement the scala.runtime.AbstractFunction1 in Java environment, it is not readily serializable. (AbstractFunction1 does not implement java.io.Serializable interface)

So, as a solution, we implemented our own AbstractFunction1 implementation as follows, and it actually worked!

public class AnalyticsFunction1 extends AbstractFunction1<Iterator<Row>, BoxedUnit>
 implements Serializable {

 private static final long serialVersionUID = -1919222653470217466L;
 private int tId;
 private String tName;
 private StructType sch;

 public AnalyticsFunction1(int tId, String tName, StructType sch) {
 this.tId = tId;
 this.tName = tName;
 this.sch = sch;
 }

 @Override
 public BoxedUnit apply(Iterator<Row> iterator) {
 List<Record> records = new ArrayList<>();
 while (iterator.hasNext()) {
 if (records.size() == AnalyticsConstants.MAX_RECORDS) {
 try {
 ServiceHolder.getAnalyticsDataService().put(records);
 } catch (AnalyticsException e) {
 e.printStackTrace();
 }
 records.clear();
 } else {
 Row row = iterator.next();
 records.add(new Record(this.tId, this.tName,
 convertRowAndSchemaToValuesMap(row, this.sch)));
 }
 }

 if (!records.isEmpty()) {
 try {
 ServiceHolder.getAnalyticsDataService().put(records);
 } catch (AnalyticsException e) {
 e.printStackTrace();
 }
 }
 return BoxedUnit.UNIT;
 }

 private Map<String, Object> convertRowAndSchemaToValuesMap(Row row, StructType schema) {
 String[] colNames = schema.fieldNames();
 Map<String, Object> result = new HashMap<>();
 for (int i = 0; i < row.length(); i++) {
 result.put(colNames[i], row.get(i));
 }
 return result;
 }

}

It can be instantiated as follows…


data.foreachPartition(new AnalyticsFunction1(tenantId, tableName, data.schema()));

You can access the GitHub repo here.

sum up!

  • While iterating through a DataFrame, try your best to avoid ‘collect()’ method
  • Try to always use a method which returns an iterator to the data.
  • When using ‘foreachPartition()’ in Java, implement the anonymous function in an extended class which implements java.io.Serializable interface
  • Read this Databricks Knowledgebase: General Troubleshooting