Setup a local Kubernetes cluster – Short Guide!

Hi all,

Here’s a short guide for setting up a local Kube cluster using kubeadm in Ubuntu 16.04. Please refer the references for detailed guides from Google Kubernetes Project.

I will be using 2 local machines.

NOTE: This will be a quick local setup and hence I had to strip off most of the security measures. THIS IS NOT A PRODUCTION SETUP!

Installation

1. Install Docker CE 17.03 (Ver 17.03 is important. Currently Kubenetes does not support Docker 18.x). Use ‘sudo su’. For more check here.

apt-get update
apt-get install -y apt-transport-https ca-certificates curl software-properties-common
curl -fsSL https://download.docker.com/linux/ubuntu/gpg | apt-key add -
add-apt-repository "deb https://download.docker.com/linux/$(. /etc/os-release; echo "$ID") $(lsb_release -cs) stable"
apt-get update && apt-get install -y docker-ce=$(apt-cache madison docker-ce | grep 17.03 | head -1 | awk '{print $3}')


2. Install kubeadm and dependencies. Use ‘sudo su’. For more check here.

apt-get update && apt-get install -y apt-transport-https curl
curl -s https://packages.cloud.google.com/apt/doc/apt-key.gpg | apt-key add -
cat <<EOF >/etc/apt/sources.list.d/kubernetes.list
deb http://apt.kubernetes.io/ kubernetes-xenial main
EOF
apt-get update
apt-get install -y kubelet kubeadm kubectl


3. Check if the kubelet service is running

sudo service kubelet status

if it is not, running, then there is some issue in the installation.


Initializing the Kube Master

1. Check which pod network add-on you are going to use from here. I chose Calico and hence I need to pass –pod-network-cidr=192.168.0.0/16 to kubeadm init

2. Turn off swap

sudo swapoff -a

3. Initialize Kube Master

sudo kubeadm init --pod-network-cidr=192.168.0.0/16

If all goes well, you would get the following output. It would be useful to save this output as we would need it in joining the members later.

Your Kubernetes master has initialized successfully!

To start using your cluster, you need to run the following as a regular user:

mkdir -p $HOME/.kube
 sudo cp -i /etc/kubernetes/admin.conf $HOME/.kube/config
 sudo chown $(id -u):$(id -g) $HOME/.kube/config

You should now deploy a pod network to the cluster.
Run "kubectl apply -f [podnetwork].yaml" with one of the options listed at:
 https://kubernetes.io/docs/concepts/cluster-administration/addons/

You can now join any number of machines by running the following on each node
as root:

kubeadm join <master_IP>:<master_port> --token <master_token> --discovery-token-ca-cert-hash sha256:<sha_value>

4. As the output suggests, lets copy the admin.conf to $HOME/.kube/config. This would be the default location from which kubectl gets the configurations.

mkdir -p $HOME/.kube
 sudo cp -i /etc/kubernetes/admin.conf $HOME/.kube/config
 sudo chown $(id -u):$(id -g) $HOME/.kube/config

5. And then let’s add the pod cluster network. I chose Calico.

kubectl apply -f https://docs.projectcalico.org/v3.1/getting-started/kubernetes/installation/hosted/rbac-kdd.yaml
kubectl apply -f https://docs.projectcalico.org/v3.1/getting-started/kubernetes/installation/hosted/kubernetes-datastore/calico-networking/1.7/calico.yaml


6. Isolate Master. For more check here.

kubectl taint nodes --all node-role.kubernetes.io/master-

By default, cluster will not schedule pods on the master for security reasons. But for this deployment, we can ‘untaint’ master.

7. Check if the administration pods are running, especially kube-dns pod.

kubectl get pods --all-namespaces


Install Kube Dashboard

Best docs for kube dashboard are found here.

1. Install kube dashboard pod

kubectl apply -f https://raw.githubusercontent.com/kubernetes/dashboard/master/src/deploy/recommended/kubernetes-dashboard.yaml


2. Create a service account. Say kube-system

cat << EOT >$HOME/.kube/kube-system.yaml
apiVersion: v1
kind: ServiceAccount
metadata:
 name: admin-user
 namespace: kube-system
EOT

kubectl apply -f $HOME/.kube/kube-system.yaml


3. Create a ClusterRoleBinding for kube-system

cat << EOT >$HOME/.kube/role.yaml
apiVersion: rbac.authorization.k8s.io/v1beta1
kind: ClusterRoleBinding
metadata:
  name: admin-user
roleRef:
  apiGroup: rbac.authorization.k8s.io
  kind: ClusterRole
  name: cluster-admin
subjects:
- kind: ServiceAccount
  name: admin-user
  namespace: kube-system
EOT

kubectl apply -f $HOME/.kube/role.yaml


4. Get the bearer token to access the dashboard

kubectl -n kube-system describe secret $(kubectl -n kube-system get secret | grep admin-user | awk '{print $1}')


5. Start kube proxy

nohup kubectl proxy > kubectl_proxy.log &


6. Log in to the dashboard using the token obtained from #4

http://localhost:8001/api/v1/namespaces/kube-system/services/https:kubernetes-dashboard:/proxy/


Joining member nodes to the cluster

Once the master is initiated, you can more members to the cluster using the kubeadm join command output generated by the master.

sudo kubeadm join <master_IP>:<master_port> --token <master_token> --discovery-token-ca-cert-hash sha256:<sha_value>

NOTE: Member nodes also have to have the dependencies installed.

For more information check here.


Summary – CASA and LEAD: Adaptive Cyberinfrastructure for Real-Time Multiscale Weather Forecasting

  • Paper article download – casa-and-lead
  • Published – Published by the IEEE Computer Society 2006 IEEE
  • CASA – Collaborative Adaptive Sensing of the Atmosphere (http://www.casa.umass.edu)
  • LEAD – Linked Environments for Atmospheric Discovery
  • Two complementary projects
  • Advantages
    • directly interact with data from instruments as well as control the instruments themselves
    • LEAD establish an interactive closed loop between
      the forecast analysis and the instruments
  • goals
    • Dynamic workflow adaptivity
    • dynamic resource allocation
    • continuous feature detection and data mining
    • model adaptivity
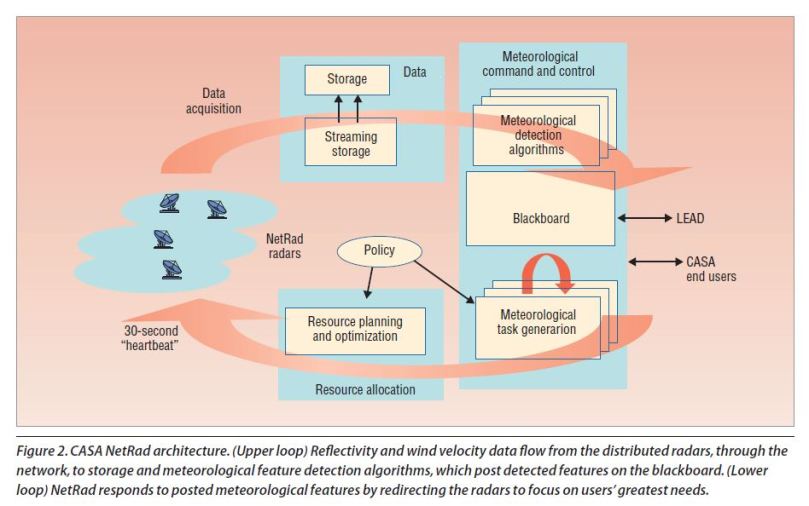
  • CASA comprises an observational loop with data streams linking the radars to the meteorological command and control (MC&C) module which in turn generates control messages back to the radars
  • LEAD comprises a modeling loop, which executes forecast models in response to weather conditions. It requires data storage tools to automate data staging
    and collection and monitoring tools to enhance reliability and fault tolerance
  • LEAD has a path back to the radars for steering the radar location, while CASA mediates potential conflicting interests in determining the next radar position

CASA

  • CASA is designed to detect and predict hazardous weather in the lowest few kilometers of the earth’s atmosphere using distributed, collaborative, adaptive sensing (DCAS)
  • Components
    • Network of radars (NetRad) – mechanically scanning X-band radars with overlapping footprints
    • meteorological algorithms that detect, track, and predict hazards
    • user preference and policy modules that determine the relative utility of performing alternative sensing actions
    • the MC&C, an underlying substrate of distributed computation, communication, and storage that dynamically processes sensed data and manages system resources
    • control interfaces that let users access the system. The MC&C currently executes on

casa

LEAD

  • LEAD is developing the middleware that facilitates adaptive utilization of distributed resources, sensors, and workflows.
  • Constructed as a service-oriented architecture,4 the system decomposes into services that communicate with one another via well-defined interfaces and protocols.
  • Data subsystem – consists of about a dozen services that provide online data mining and filtering of streaming data in support of on-demand forecast initiation, indexing and accessing of heterogeneous community and personal collections, personal workspace management, querying of rich domain-specific metadata utilizing ontologies, and automated metadata generation.
  • Tools
    • Unidata’s Internet Data Distribution (www.unidata.ucar.edu/software/idd/iddams.html)
    • Thematic Real-Time Environmental Distributed Data
      Services (www.unidata.ucar.edu/projects/THREDDS),
    • Local Data Manager (www.unidata.ucar.edu/
      software/ldm)
    • Open Source Project for a Network Data Access Protocol (OPeNDAP; http://www.opendap.org)
  • Search Support – provides search support over heterogeneous collections as well as concept-based searching
  • User Interface

DYNAMIC WORKFLOW ADAPTIVITY

  • CASA uses a blackboard-based framework in which cooperating agents post messages in response to a current situation or problem
  • The goal of a LEAD workflow is to carry a prediction scenario from the gathering of observation data to user visualization.
  • A typical workflow would start with a signal from a data mining service or a signal from the CASA system indicating possible storm formation in a particular region.

DYNAMIC RESOURCE ALLOCATION

  • Resource allocation in CASA involves the dynamic, collaborative tasking and retasking of radars to meet user needs.
  • Dynamic resource allocation in LEAD takes the form of a very distributed Web services infrastructure to manage data repositories and launch jobs on large computer resources. Because of the better-than-real-time requirements of storm forecasting, the needed resources must be available on demand.
  • If a workflow requires a large ensemble of simulations to launch, it is imperative to locate enough computational power to run the simulations as quickly as possible.
  • TeraGrid researchers are working on procedures that will allow on-demand scheduling of large computation under emergency situations such as an impending tornado or hurricane.
  • LEAD also requires a strategy that lets workflows change how they use resources. For example, as a storm progresses, it might be necessary to dynamically change the workflow and launch additional simulations that were not initially anticipated

CONTINUOUS FEATURE DETECTION AND DATA MINING

  • CASA continuously extracts features from data that weather-observing instruments gather, while researchers can use LEAD to dynamically mine such data to refocus detection efforts.
  • Feature detection
  • Data mining

MODEL ADAPTIVITY


WSO2 DAS – Spark Cluster tuning…

Cont’d from the previous blog post

As mentioned earlier, WSO2 DAS embeds Spark, and by default a Spark cluster is created inside  a DAS cluster. In this post, we will look at how we could configure the nodes, to get the best out of the DAS analytics cluster.

For more information about how clustering is done in DAS, please refer the DAS Clustering Guide.

DAS Cluster – Explained…

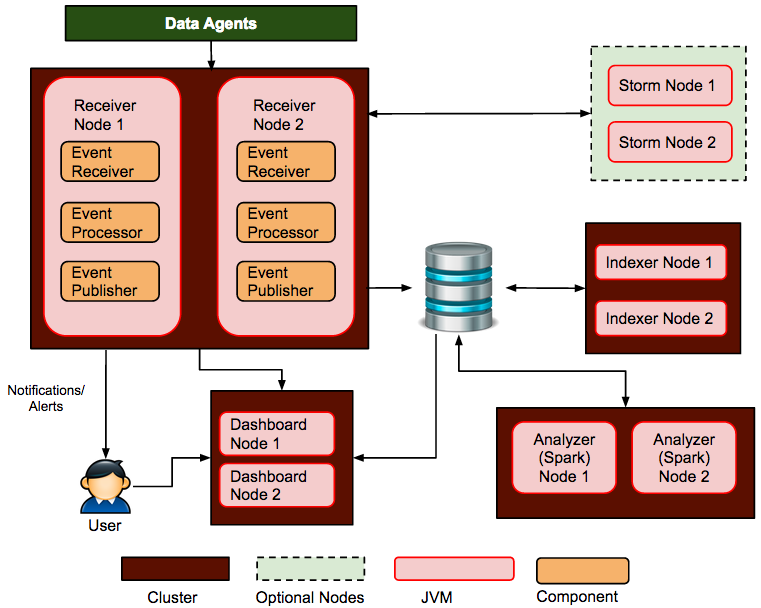
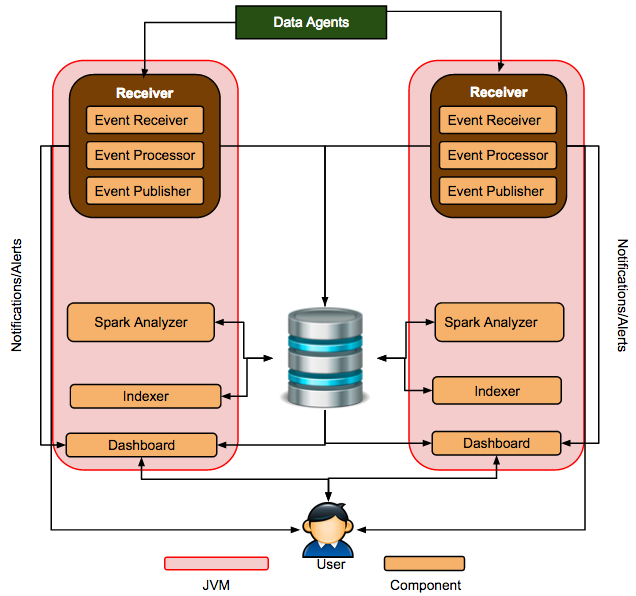
A typical DAS cluster can be depicted as follows.

image2015-8-2020143a413a7

In this setup, the Spark cluster resides in the “Analyzer sub cluster”. It will be responsible for instantiating the masters, workers and the driver application.

The main configurations of the DAS cluster is governed by the <DAS home>/repository/conf/analytics/spark/spark-defaults.conf file. The default content of this file is as follows.


# ------------------------------------------------------
# CARBON RELATED SPARK PROPERTIES
# ------------------------------------------------------
carbon.spark.master local
carbon.spark.master.count 1
carbon.spark.results.limit 1000
carbon.scheduler.pool carbon-pool

# ------------------------------------------------------
# SPARK PROPERTIES
# ------------------------------------------------------

# Application Properties
spark.app.name CarbonAnalytics
spark.driver.cores 1
spark.driver.memory 512m
spark.executor.memory 512m

# Runtime Environment

# Spark UI
spark.ui.port 4040
spark.history.ui.port 18080

# Compression and Serialization
spark.serializer org.apache.spark.serializer.KryoSerializer
spark.kryoserializer.buffer 256k
spark.kryoserializer.buffer.max 256m

# Execution Behavior

# Networking
spark.blockManager.port 12000
spark.broadcast.port 12500
spark.driver.port 13000
spark.executor.port 13500
spark.fileserver.port 14000
spark.replClassServer.port 14500

# Scheduling
spark.scheduler.mode FAIR

# Dynamic Allocation

# Security

# Encryption

# Standalone Cluster Configs
spark.deploy.recoveryMode CUSTOM
spark.deploy.recoveryMode.factory org.wso2.carbon.analytics.spark.core.deploy.AnalyticsRecoveryModeFactory

# Master
spark.master.port 7077
spark.master.rest.port 6066
spark.master.webui.port 8081

# Worker
spark.worker.cores 1
spark.worker.memory 1g
spark.worker.dir work
spark.worker.port 11000
spark.worker.webui.port 11500

# Spark Logging

# To allow event logging for spark you need to uncomment
# the line spark.eventlog.log true and set the directory in which the
# logs will be stored.

# spark.eventLog.enabled true
# spark.eventLog.dir &amp;amp;amp;amp;amp;amp;amp;amp;lt;PATH_FOR_SPARK_EVENT_LOGS&amp;amp;amp;amp;amp;amp;amp;amp;gt;

There are 2 sections

  • Carbon related configurations

These are carbon specific properties when running Spark in the Carbon environment and they start with the prefix “carbon.”

  • Spark configurations

These are the default properties shipped by Spark. Please refer this for Spark environment variables.


I will explain the uses of these configuration as I explain the setup of a Spark Cluster.

DAS Spark Clustering approach

DAS Spark cluster is controlled by the carbon clustering and a sub-cluster abstraction. This sub-cluster has enabled DAS to create a subset of members in its carbon cluster. These subsets are being used for DAS analytics cluster as well as the indexing cluster.

Default setup

In the vanilla DAS pack, Spark would start in the “local” mode. Refer this.

Single node setup

In the single node setup, the DAS server will instantiate a master, a worker and a spark app all in a single node. To enable this, you would have to enable carbon clustering in axis2.xml file and leave ‘carbon.spark.master local’ as it is.

Multi node setup

This will be an extension to the single node setup. A multi-node setup is used to achieve high availability (HA) in the DAS analytics cluster. In addition to single node setup configs, ‘carbon.spark.master.count’ becomes an important property in this setup. carbon.spark.master.count specifies the number of masters which should be available in the analytic cluster.

In a multiple master setup, there will be one active master and the rest will be standby. The active master will be responsible for distributing the resources among the executors.

Once the carbon.spark.master.count is reached, each member of the analytics cluster, would start a worker pointing to a list of available masters (both active and standby).

Once the masters and the workers are instantiated, the Spark cluster configuration completes. Then a spark application will be spawned in the analytic cluster leader.

This setup can handle master and/or worker fail overs. Let us talk in detail about this in another blog post.

Resource tuning of DAS analytic nodes

In a DAS production environment, it is important to allocate the resources correctly to each node, in order to achieve optimum performance.

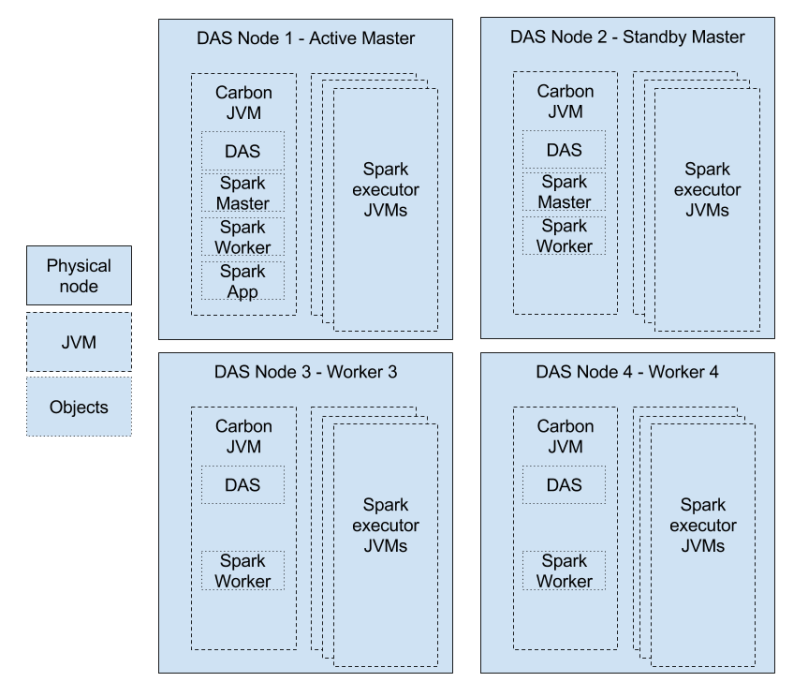
Let us first look at a typical multi node DAS setup, to understand how the resources should be allocated.

das muti node setup


As you could see here, the resources of the cluster need to be distributed among these components depending on the requirement.

Main configuration parameters

There are several important configuration parameters. Resources are mainly revolve around the number of cores available and memory available. (Note that DAS is using the Standalone cluster mode)

Parameter Default value Comment
Cores
spark.executor.cores All the available cores on the worker The number of cores to use on each executor. Setting this parameter allows an application to run multiple executors on the same worker, provided that there are enough cores on that worker. Otherwise, only one executor per application will run on each worker.
spark.cores.max Int.MAX_VALUE The maximum amount of CPU cores to request for the application from across the cluster (not from each machine)
spark.worker.cores 1 The number of cores assigned for a worker.
Memory
spark.worker.memory 1g Amount of memory to use per worker, in the same format as JVM memory strings (e.g.512m, 2g).
spark.executor.memory 512m Amount of memory to use per executor process, in the same format as JVM memory strings (e.g.512m, 2g).

So, the number of executors in a single worker for the carbon-application can be derived from,

number of executors in a single worker

= FLOOR ( MIN (spark.worker.cores, spark.cores.max) / spark.executor.cores )

Then the amount of memory which should be allocated for a worker should be,

spark.worker.memory ≥ spark.executor.memory ×  number of executors

Configuration patterns

By setting different values for each of the parameters above, we can have different configuration patterns.

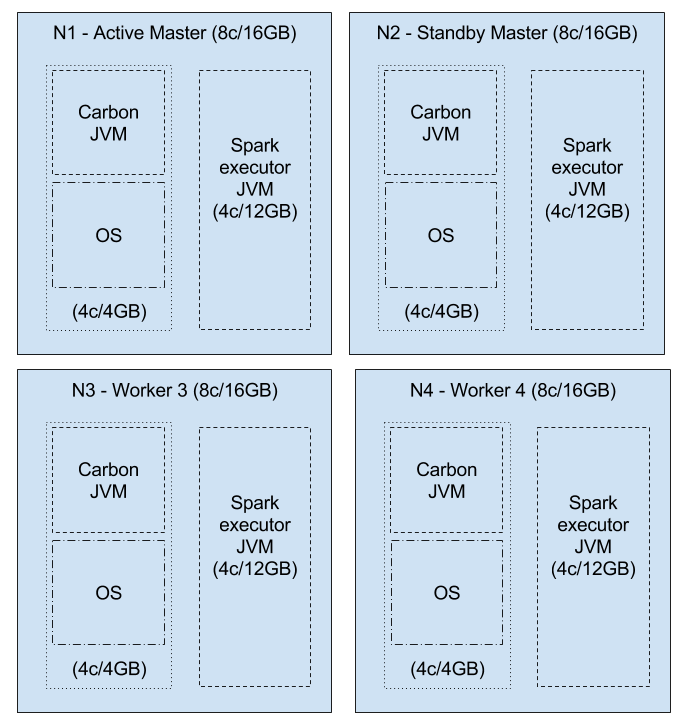
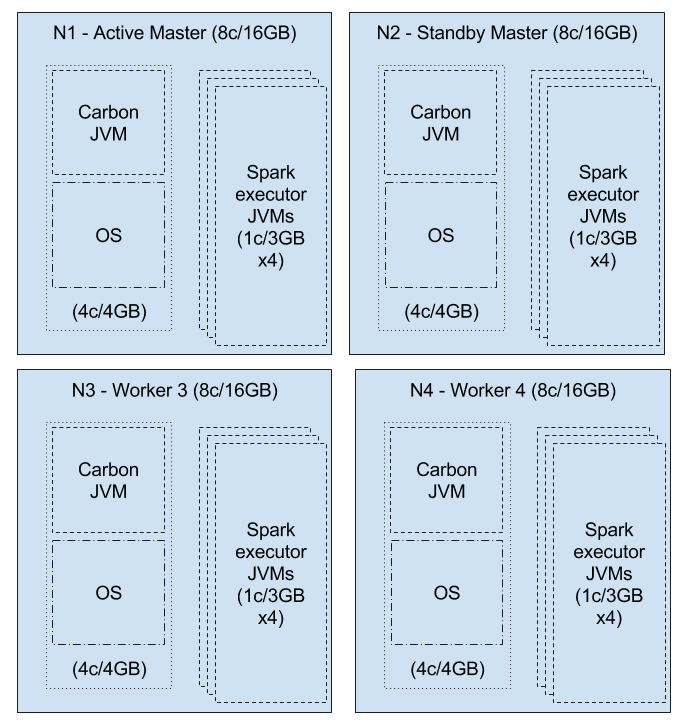
Let’s take an AWS m4.xlarge instance for an example. It has 8 vCPUs and 16 GB memory. If we allocate 4 GB and 4 cores to the OS and the Carbon JVM (by default this only takes 1GB memory), then we can allocate spark.worker.memory = 12g and spark.worker.cores = 4.

Single executor workers

If we do not specify spark.cores.max or spark.executor.cores then, all the available cores will be taken up by one executor.

Executors = min (4,Int.MAX_VALUE)/4 = 1

So, we could allocate all the memory for that executor, i.e. spark.executor.memory=12g

das single executor .png

NOTE: Having large amount of memory for a single JVM is not advisable, due to GC performance.

Multiple executor workers

Let’s say, we  specify spark.executor.cores = 1

Then executors = min (4, Int.MAX_VALUE) / 1 = 4

Therefore, we could allocate 12GB/4 = 3GB per executor

das multi executor .png

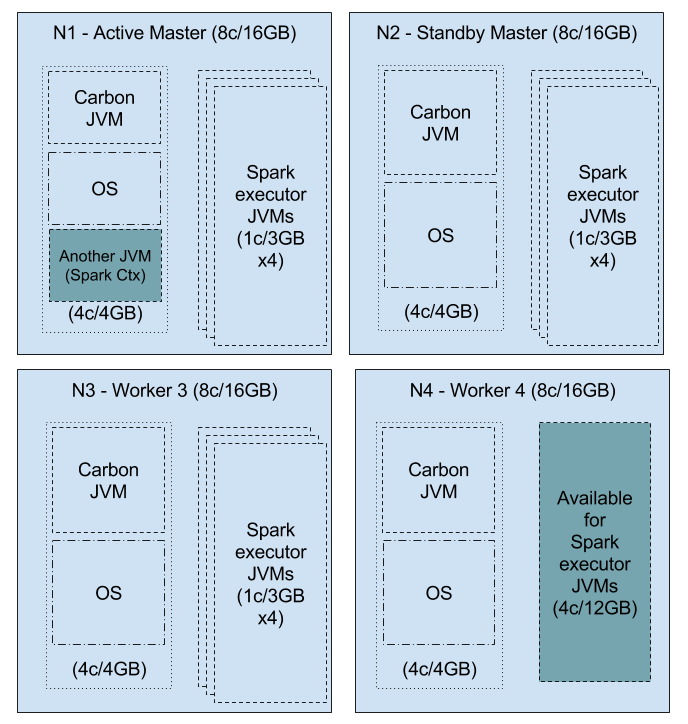
Resource limited workers

We can limit the number of cores used for the carbon application cluster-wide by setting the  spark.cores.max value.

Let’s set  spark.cores.max = 3 per node x 4 nodes = 12. Then, there is an excess of 4 cores, which can be used by some other application.

Let’s take the above multiple executor setup.

das limited executor .png

Here, there are is resources for 16 executors with 16 cores and 48GB of memory. With the spark.cores.max = 12 (i.e. 3 x 4), 12 executors will be assigned to the carbon application and the rest of the cores and memory can be assigned for another spark application, i.e. 4 cores and 12 GB will be available in the cluster, which can be used by the application, depending on its preference.


So, as depicted above, depending on the requirement and resources available, you should distribute the cores and memory among the workers.

Cheers


Dynamics of a Spark Cluster WRT WSO2 DAS…

WSO2 DAS (Data Analytics Server) v3.0.1 was released last week and it is important for us to understand how a DAS cluster operates.

It employs Apache Spark 1.4.2.wso2v1 (this will be upgraded to the latest Spark version in the upcoming DAS 3.1.0 release, scheduled for 2016). DAS 3.0.1 uses Spark Standalone mode cluster manager, and uses its underlying Carbon clustering (powered by Hazelcast) for managing the cluster.

Understanding a Spark cluster

WSO2 DAS embeds Spark, and creates a Spark cluster on its own. So, it is imperative to understand the dynamics of a Spark cluster.

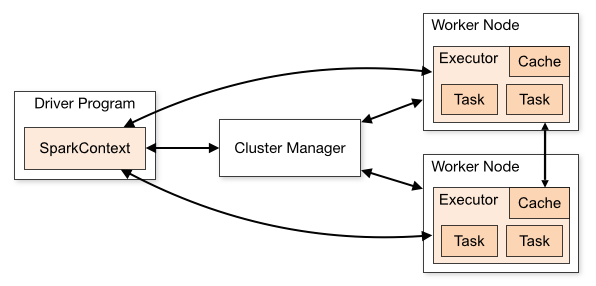
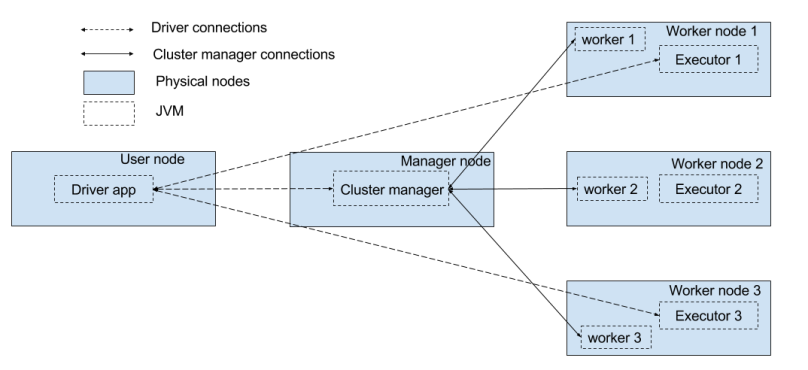
As per the Spark docs, following figure depicts a standard cluster

cluster-overview

These are the key elements of a Spark cluster (Referring to the Spark glossary).

Driver – A separate java process spawn when creating a SparkContext (SC) object. (NOTE: As per the current implementation, only one SC object can be present in a single JVM). It is the main() function of an application.

Cluster manager – This manages the resources of a cluster. There are several cluster managers available for Spark, and DAS uses the “Standalone cluster manager”

Worker – Any node that can run application code in the cluster

Executor – A process launched for an application on a worker node, that runs tasks and keeps data in memory or disk storage across them. Each application has its own executors.

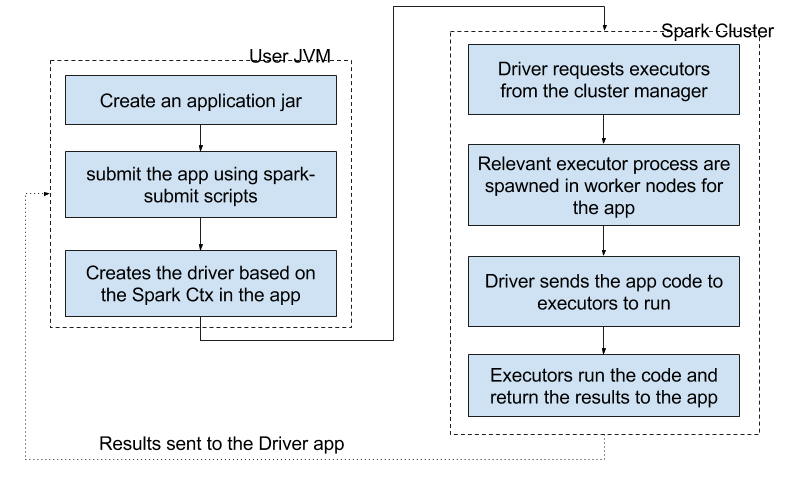
How is an application submitted to Spark

The default way of submitting an application to a Spark cluster is, by using the provided spark-submit scripts. The process can be depicted as follows.


spark app submission process.png

Essentially there are several java processes spawning in order to achieve this.

  • Driver process (in the spark-submit running JVM)
  • Spark cluster manager (already running)
  • Executor processes in the worker node


spark jvms

So, when you create the application, you have to instruct the spark-submit scripts about how much memory, cores etc to be used for the driver process. These are governed by parameters such as spark.driver.cores, spark.driver.memory, etc in the SparkConf object (can be given when running the script as well).

The configurations for controlling the executor processes can be set using the parameters in SparkConf of the application. The configuration params can be found here.

Application submission process inside DAS

DAS has embedded Spark, and in the process, we have changed the application submission process. DAS does not need any application submission, instead, it creates a SparkContext when the server starts up (similar to Spark REPL).

In the DAS server startup, it creates a Spark cluster using Carbon clustering and creates a driver application (named “CarbonAnalytics” by default) in the running JVM, pointing to Spark cluster it has already created. Then the users can submit their SQL queries to the CarbonAnalytics app.

So essentially, in DAS the users can only submit SQL queries to the DAS-Spark cluster, not an application jar.

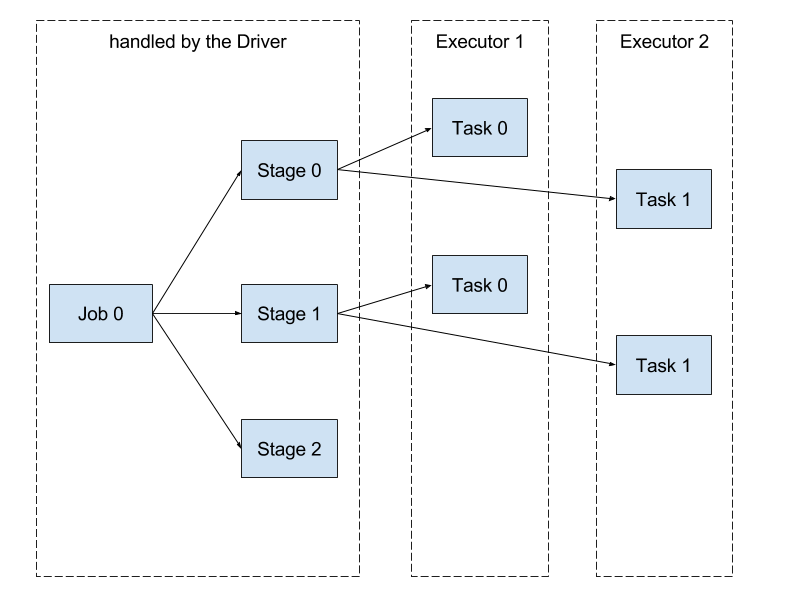
Jobs, Stages and Tasks

A Spark job consist of several stages. Each stage has several tasks. A task is a single unit of work sent to the executor.

spark jobs

Spark doc definitions are as follows

Job – A parallel computation consisting of multiple tasks that gets spawned in response to a Spark action (e.g. save, collect); you’ll see this term used in the driver’s logs.

Stage – Each job gets divided into smaller sets of tasks called stages that depend on each other (similar to the map and reduce stages in MapReduce); you’ll see this term used in the driver’s logs.

Tuning up JVMs

Since the process involves spawning several JVMs, it is important for us to understand how to tune these JVMs. Let us discuss this in the next post

Cheers

Setting up WSO2 DAS 3.0 Minimum HA Cluster

Let us look at how to set up a WSO2 Data Analytics Server 3.0.0 minimum high-availability (HA) cluster. Please refer the DAS docs here.

Minimum HA Cluster Architecture

Following figure depicts the minimum HA cluster setup of DAS.

image2015-8-2020113a283a45
DAS minimum HA setup [1]
The minimum HA cluster will employ two identical DAS nodes with the following features

  • Data receivers
  • Indexers
  • Analyzers (Spark masters and workers)
  • Dashboards
  • Shared analytic datasources
  • Shared registries

Follow the following steps to configure each elements

1 Sharing the registries 

We will setup a simple registry share as follows in both the nodes. Change the ./repository/conf/datasources/master-datasources.xml as follows.

<datasources-configuration xmlns:svns="http://org.wso2.securevault/configuration">
...
    <datasources>
    ...      
        <datasource>
            <name>WSO2_CARBON_DB</name>
            <description>The datasource used for registry and user manager</description>
            <jndiConfig>
                <name>jdbc/WSO2CarbonDB</name>
            </jndiConfig>
            <definition type="RDBMS">
                <configuration>
                    <url>jdbc:mysql://[MySQL DB url]:[port]/WSO2CARBON_DB;DB_CLOSE_ON_EXIT=FALSE;LOCK_TIMEOUT=60000</url>
                    <username>[username]</username>
                    <password>[password]</password>
                    <driverClassName>com.mysql.jdbc.Driver</driverClassName>
                    <maxActive>50</maxActive>
                    <maxWait>60000</maxWait>
                    <testOnBorrow>true</testOnBorrow>
                    <validationQuery>SELECT 1</validationQuery>
                    <validationInterval>30000</validationInterval>
                    <defaultAutoCommit>false</defaultAutoCommit>
                </configuration>
            </definition>
    ...
    </datasources>
...
</datasources-configuration>


If you need more fine grained registry mounting, you could make use of the WSO2 Clustering Guide – Setting up Databases documentation. Registry sharing strategies can be found here.


2 Setup analytic datasources

./repository/conf/datasources/analytic-datasources.xml governs the analytic data sources. Please refer the DAS docs for more information about the relationship between analytics datasources and how they map to event-stores.

<datasources-configuration>

    <providers>
        <provider>org.wso2.carbon.ndatasource.rdbms.RDBMSDataSourceReader</provider>
    </providers>

    <datasources>

        <datasource>
            <name>WSO2_ANALYTICS_FS_DB</name>
            <description>The datasource used for analytics file system</description>
            <definition type="RDBMS">
                <configuration>
                    <url>jdbc:mysql://[MySQL DB url]:[port]/ANALYTICS_FS_DB</url>
                    <username>[username]</username>
                    <password>[password]</password>
                    <driverClassName>com.mysql.jdbc.Driver</driverClassName>
                    <maxActive>50</maxActive>
                    <maxWait>60000</maxWait>
                    <testOnBorrow>true</testOnBorrow>
                    <validationQuery>SELECT 1</validationQuery>
                    <validationInterval>30000</validationInterval>
                    <defaultAutoCommit>false</defaultAutoCommit>
                </configuration>
            </definition>
        </datasource>

        <datasource>
            <name>WSO2_ANALYTICS_EVENT_STORE_DB</name>
            <description>The datasource used for analytics record store</description>
            <definition type="RDBMS">
                <configuration>
                    <url>jdbc:mysql://[MySQL DB url]:[port]/ANALYTICS_EVENT_STORE</url>
                    <username>[username]</username>
                    <password>[password]</password>
                    <driverClassName>com.mysql.jdbc.Driver</driverClassName>
                    <maxActive>50</maxActive>
                    <maxWait>60000</maxWait>
                    <testOnBorrow>true</testOnBorrow>
                    <validationQuery>SELECT 1</validationQuery>
                    <validationInterval>30000</validationInterval>
                    <defaultAutoCommit>false</defaultAutoCommit>
                </configuration>
            </definition>
        </datasource>

        <datasource>
            <name>WSO2_ANALYTICS_PROCESSED_DATA_STORE_DB</name>
            <description>The datasource used for analytics record store</description>
            <definition type="RDBMS">
                <configuration>
                    <url>jdbc:mysql://[MySQL DB url]:[port]/ANALYTICS_PROCESSED_DATA_STORE</url>
                    <username>[username]</username>
                    <password>[password]</password>
                    <driverClassName>com.mysql.jdbc.Driver</driverClassName>
                    <maxActive>50</maxActive>
                    <maxWait>60000</maxWait>
                    <testOnBorrow>true</testOnBorrow>
                    <validationQuery>SELECT 1</validationQuery>
                    <validationInterval>30000</validationInterval>
                    <defaultAutoCommit>false</defaultAutoCommit>
                </configuration>
            </definition>
        </datasource>

        <datasource>
            <name>TEST_DB</name>
            <description>The datasource used for analytics record store</description>
            <definition type="RDBMS">
                <configuration>
                    <url>jdbc:mysql://[MySQL DB url]:[port]/test_db</url>
                    <username>[username]</username>
                    <password>[password]</password>
                    <driverClassName>com.mysql.jdbc.Driver</driverClassName>
                    <maxActive>50</maxActive>
                    <maxWait>60000</maxWait>
                    <testOnBorrow>true</testOnBorrow>
                    <validationQuery>SELECT 1</validationQuery>
                    <validationInterval>30000</validationInterval>
                    <defaultAutoCommit>false</defaultAutoCommit>
                </configuration>
            </definition>
        </datasource>

    </datasources>

</datasources-configuration>


3 Cluster the nodes 

Once the data sources have been configured, we can move into clustering the two nodes. Node are clustered using Hazelcast, hence the configurations are made in the ./repository/conf/axis2/axis2.xml.

Points to note:

  • ‘wka’ will be used instead of ‘multicast’ as the membershipScheme
  • Add the corresponding nodes as the members in the cluster. Here the requirement is to have a well-known member available in the cluster (out of the member list). So, for convenience you can put both members under the members tag.


    <clustering class="org.wso2.carbon.core.clustering.hazelcast.HazelcastClusteringAgent"
                enable="true">

        <!--
           This parameter indicates whether the cluster has to be automatically initalized
           when the AxisConfiguration is built. If set to "true" the initialization will not be
           done at that stage, and some other party will have to explictly initialize the cluster.
        -->
        <parameter name="AvoidInitiation">true</parameter>

        <!--
           The membership scheme used in this setup. The only values supported at the moment are
           "multicast" and "wka"

           1. multicast - membership is automatically discovered using multicasting
           2. wka - Well-Known Address based multicasting. Membership is discovered with the help
                    of one or more nodes running at a Well-Known Address. New members joining a
                    cluster will first connect to a well-known node, register with the well-known node
                    and get the membership list from it. When new members join, one of the well-known
                    nodes will notify the others in the group. When a member leaves the cluster or
                    is deemed to have left the cluster, it will be detected by the Group Membership
                    Service (GMS) using a TCP ping mechanism.
        -->
        
        <parameter name="membershipScheme">wka</parameter>

        <!--<parameter name="licenseKey">xxx</parameter>-->
        <!--<parameter name="mgtCenterURL">http://localhost:8081/mancenter/</parameter>-->

        <!--
         The clustering domain/group. Nodes in the same group will belong to the same multicast
         domain. There will not be interference between nodes in different groups.
        -->
        <parameter name="domain">wso2.carbon.domain</parameter>

        <!-- The multicast address to be used -->
        <!--<parameter name="mcastAddress">228.0.0.4</parameter>-->

        <!-- The multicast port to be used -->
        <parameter name="mcastPort">45564</parameter>

        <parameter name="mcastTTL">100</parameter>

        <parameter name="mcastTimeout">60</parameter>

        <!--
           The IP address of the network interface to which the multicasting has to be bound to.
           Multicasting would be done using this interface.
        -->
        <!--
            <parameter name="mcastBindAddress">10.100.5.109</parameter>
        -->
        <!-- The host name or IP address of this member -->

        <parameter name="localMemberHost">[node IP]</parameter>

        <!--
            The bind adress of this member. The difference between localMemberHost & localMemberBindAddress
            is that localMemberHost is the one that is advertised by this member, while localMemberBindAddress
            is the address to which this member is bound to.
        -->
        <!--
        <parameter name="localMemberBindAddress">[node IP]</parameter>
        -->

        <!--
        The TCP port used by this member. This is the port through which other nodes will
        contact this member
         -->
        <parameter name="localMemberPort">[node port]</parameter>

        <!--
            The bind port of this member. The difference between localMemberPort & localMemberBindPort
            is that localMemberPort is the one that is advertised by this member, while localMemberBindPort
            is the port to which this member is bound to.
        -->
        <!--
        <parameter name="localMemberBindPort">4001</parameter>
        -->

        <!--
        Properties specific to this member
        -->
        <parameter name="properties">
            <property name="backendServerURL" value="https://${hostName}:${httpsPort}/services/"/>
            <property name="mgtConsoleURL" value="https://${hostName}:${httpsPort}/"/>
            <property name="subDomain" value="worker"/>
        </parameter>

        <!--
        Uncomment the following section to load custom Hazelcast data serializers.
        -->
        <!--
        <parameter name="hazelcastSerializers">
            <serializer typeClass="java.util.TreeSet">org.wso2.carbon.hazelcast.serializer.TreeSetSerializer
            </serializer>
            <serializer typeClass="java.util.Map">org.wso2.carbon.hazelcast.serializer.MapSerializer</serializer>
        </parameter>
        -->

        <!--
           The list of static or well-known members. These entries will only be valid if the
           "membershipScheme" above is set to "wka"
        -->
        <members>
            <member>
                <hostName>[node1 IP]</hostName>
                <port>[node1 port]</port>
            </member>
            <member>
                <hostName>[node2 IP]</hostName>
                <port>[node2 port]</port>
            </member>
        </members>

        <!--
        Enable the groupManagement entry if you need to run this node as a cluster manager.
        Multiple application domains with different GroupManagementAgent implementations
        can be defined in this section.
        -->
        <groupManagement enable="false">
            <applicationDomain name="wso2.as.domain"
                               description="AS group"
                               agent="org.wso2.carbon.core.clustering.hazelcast.HazelcastGroupManagementAgent"
                               subDomain="worker"
                               port="2222"/>
        </groupManagement>
    </clustering>


Now the two nodes will join the cluster when they start-up. The indexer feature would automatically use this cluster and distribute the work load.

As per the analyzer function, there are a few more configurations.

Analyzer configuration

DAS Analyzer feature is powered by Apache Spark. Spark cluster can be used in several ways, and for HA, we are using the embedded Spark cluster in DAS.

Spark clustering configurations are governed by ./repository/conf/analytics/spark/spark-defaults.conf file.

Points to note when using the embedded Spark cluster:

  • Keep the carbon.spark.master configuration as local. This instructs Spark to create a spark cluster using the Hazelcast cluster
  • carbon.spark.master.count has to be 2, in a minimum HA cluster. This means that there will be two masters in the Spark cluster, i.e. an active master and a standby master
  • carbon.das.symbolic.link is an important configuration. This is the location of  a symbolic link which points to the <DAS_HOME> of that particular node. For an example:

  /opt/das/das_symlink/ –> /home/ubuntu/wso2das-3.0.0/

The important point to note here is that, in both the nodes, the symbolic link needs to be created in the same location, for an example /opt/das/das_symlink/.

Symbolic link can be created as follows

ln -s [path to DAS HOME] [path to symlink]

The configuration parameters would look like this.


carbon.spark.master local
carbon.spark.master.count 2
# this configuratoin can be used to point to a symbolic link to WSO2 DAS HOME
carbon.das.symbolic.link /home/ubuntu/das/das_symlink/
# this configuration can be used with the spark fair scheduler, when fair schedule pools are used. the
# defualt pool name for carbon is 'carbon-pool'
# carbon.scheduler.pool carbon-pool

# ------------------------------------------------------
# SPARK PROPERTIES
# ------------------------------------------------------
# Default system properties included when running spark.
# This is useful for setting default environmental settings.
# Check http://spark.apache.org/docs/latest/configuration.html#environment-variables for further information


4 Troubleshooting

Once the nodes are clustered, we are good to go! Let us see, how we can verify our cluster.

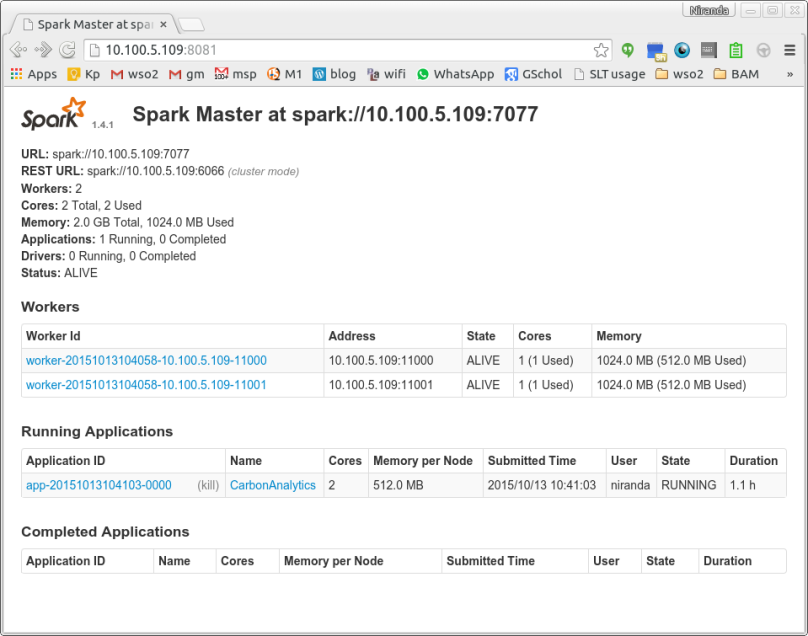
  • The cluster should have an active Spark master and a standby master.

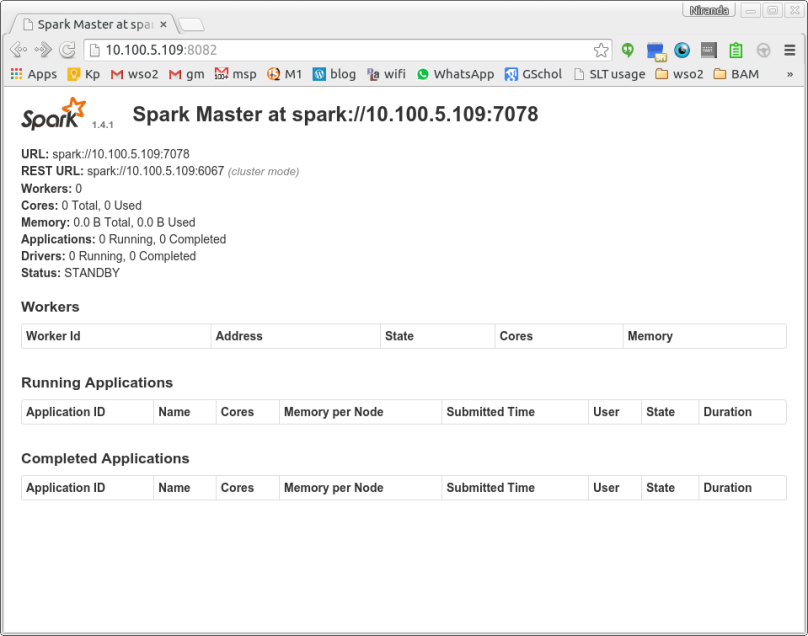
The active master UI would look like this, and it can be accessed [node ip]:8081 by default

active master

Then the other node’s same UI port should show the standby master.

standby master

  • Check the Spark application UI

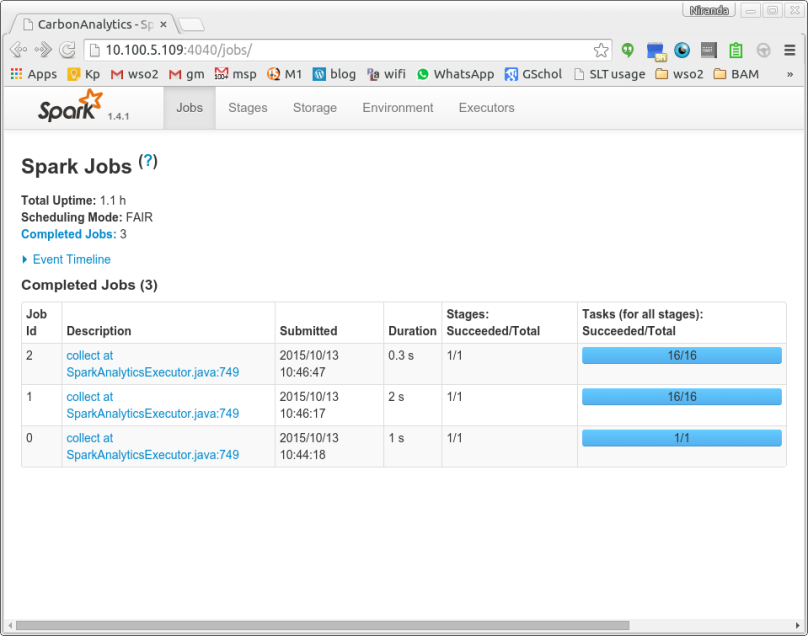
When you access the running applications in the active master, it redirects you to the Spark application UI. A working application should look like this

driver ui

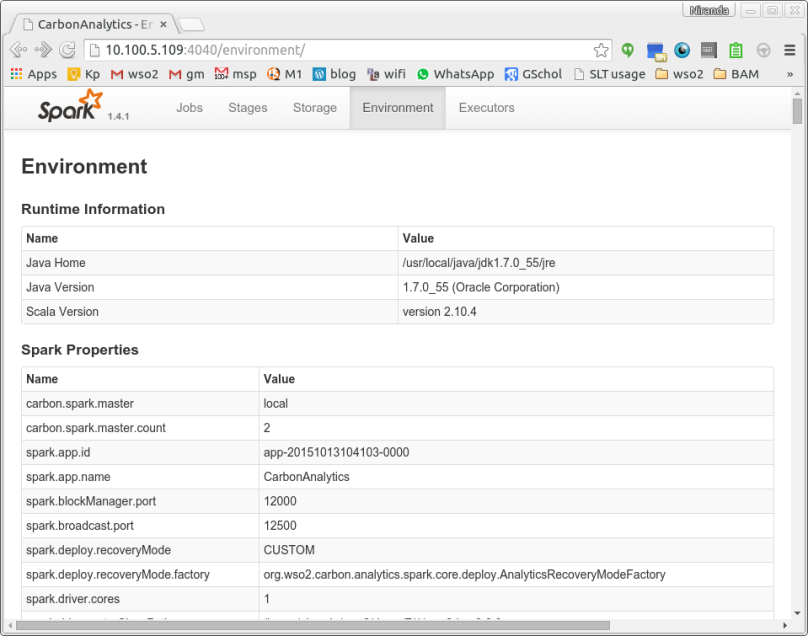
NOTE: Check the environment tabs, to see if all the configuration parameters are set properly.

driver env

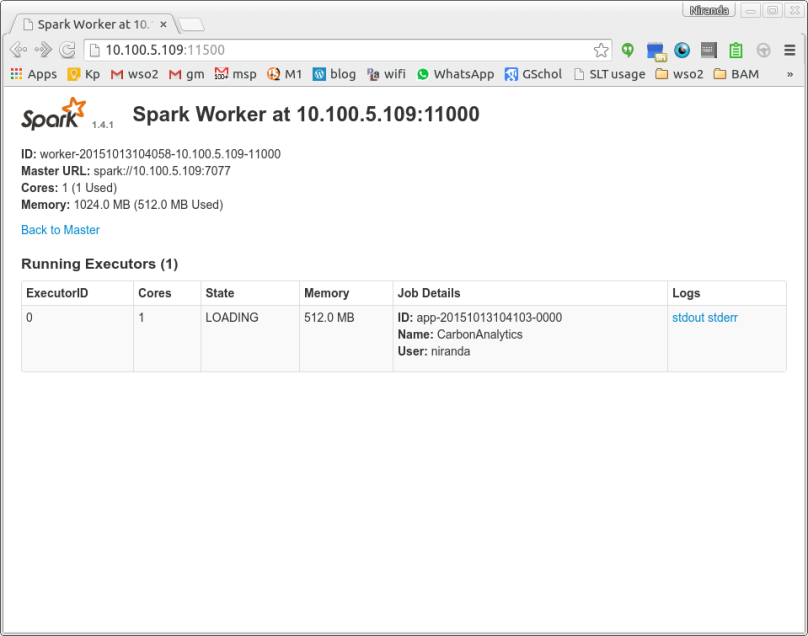
  • Check the worker UI, to see if it has running executors

worker

If the executors are not present, or Spark cluster is continuously creating executors, this indicates that there is some issue in the spark cluster configuration.

Double check the symbolic parameter, and check if you could manually access it by a ‘cd [directory]’ command.

Check the environment tab in the Spark app and see if the set classpath variables can be accessed manually.

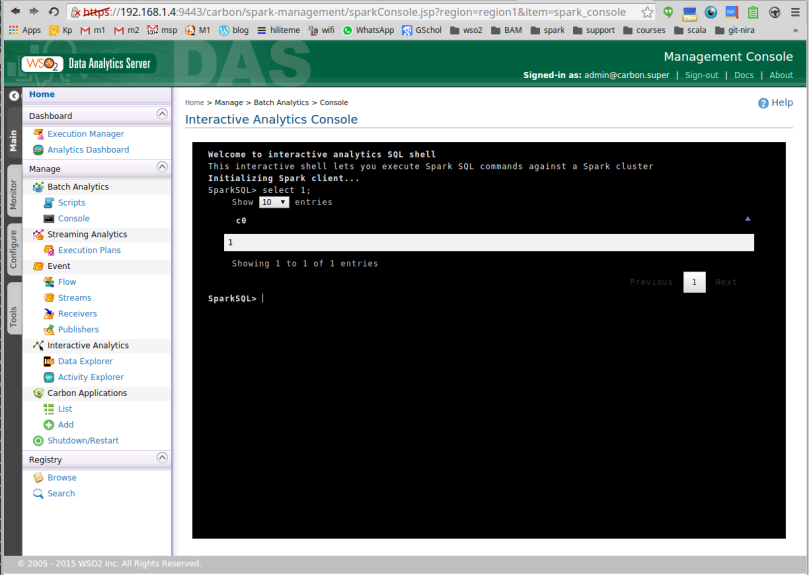
  • Run a dummy query from the DAS management console

If everything is fine, run a dummy query in the Spark console UI.

“SELECT 1”

console.png


5 Publish events

When you are publishing data into a DAS cluster, you would be using the WSO2 Event (Thrift) publisher predominately.

Therefore, you would have to use client side load balancing. Please refer this documentation.


Cheers

Nira


Installing CUDA 7.5 in Linux Mint 17.2

I have been an ardent fan of GPU programming, but installing CUDA in Linux Mint, was sort of nightmare! Finally got it working, so I guess I should share it with everyone.

‘apt-get install cuda’ MIGHT NOT WORK! 

This is the biggest problem with Linux Mint 17.2 + CUDA. In Ubuntu 14.04, it fairly straightforward.

  • Download the repository package from the CUDA download site here.
  • Then,

$ sudo dpkg -i cuda-repo-ubuntu1404_7.5-18_amd64.deb

$ sudo apt-get update

$ sudo apt-get install cuda

But in Linux Mint, you might see the following error!


$ sudo apt-get install cuda

Reading package lists... Done
Building dependency tree
Reading state information... Done
Some packages could not be installed. This may mean that you have
requested an impossible situation or if you are using the unstable
distribution that some required packages have not yet been created
or been moved out of Incoming.
The following information may help to resolve the situation:

The following packages have unmet dependencies:
cuda : Depends: cuda-7-5 (= 7.5-18) but it is not going to be installed
E: Unable to correct problems, you have held broken packages.


Install CUDA using the .run file

So, the solution here would be to install CUDA using the .run file as follows. (Got some assistance from this post in Reddit)

  • Create a folder and download the CUDA 7.5 .run file from CUDA download site

cd ~/Downloads

mkdir nvidia_installer

cd nvidia_installer

wget http://developer.download.nvidia.com/compute/cuda/7.5/Prod/local_installers/cuda_7.5.18_linux.run

chmod +x cuda_7.5.18_linux.run

./cuda_7.5.18_linux.run -extract=~/Downloads/nvidia_installer

  • This would unpack the run files into the driver, cuda-installer and cuda samples. Get the driver version of the installer and check if it supports the GPU device. In the current version, the driver version was 352.39.
  • Without hassle, let’as use apt-get to install this driver. Might have to restart to make it in effect.
sudo add-apt-repository ppa:graphics-drivers/ppa sudo apt-get update sudo apt-get install nvidia-352 nvidia-settings

  • Then let’s install CUDA and its samples by going into the terminal screen. Press ctrl+alt+F1

sudo service mdm stop
sudo init 3
sudo ./cuda-linux64-rel-7.5.18-19867135.run
sudo ./cuda-samples-linux-7.5.18-19867135.run
sudo init 5
sudo service mdm start

  • Set up the development environment by adding the following lines in the bash script

$ export PATH=/usr/local/cuda-7.5/bin:$PATH
$ export LD_LIBRARY_PATH=/usr/local/cuda-7.5/lib64:$LD_LIBRARY_PATH

$ export CUDA_PATH=/usr/local/cuda-7.5

  • Build the samples and run

cd /usr/local/cuda/samples/1_Utilities/deviceQuery
sudo make
sudo ./deviceQuery

  • NOTE: In case, you get a driver mismatch error, install the driver again as above

I hope this helps you!


Cheers

Nira

Using Spark Datasources API

In this post, let us take a look at how Apache Spark Datasources API, its concepts and how it can be implemented using an example from the WSO2 DAS.

Datasources API

Spark Datasources API is an important extension point in Apache Spark and Spark SQL. It allows users to link a Dataframe to a variety of datasources. A Dataframe is an extension of a RDD with a schema attached to it. This allows users to query the underlying datasource using SQL (Spark SQL specifically).

Here, we will discuss the concepts and motivation behind the API, followed by a concrete implementation of the interfaces in the Java environment.

API Code and Concepts 

You can find the code for the API in the ####org.apache.spark.sql.sources package. Here, the extension points can be found with the annotation @DeveloperAPI. interfaces.scala has all the traits required in the API.

Rather than discussing the traits in the interfaces.scala file, let us go through the code, linking it with concepts behind the API.

How datasources are connected to an RDD 

For Spark Core requires an RDD object to perform any computation on data and Spark SQL needs a schema around an RDD so that it could link it to a Dataframe.

This process starts by creating a “Relation” and a “Scan”.

Let us look at this in a little more detail.

BaseRelation 

This is the abstract class, which specifies the schema of the Dataframe. Classes which extend this, should be able to implement a method to return the schema as a StructType. Please find the code here.


@DeveloperApi
abstract class BaseRelation {
 def sqlContext: SQLContext
 def schema: StructType

 def sizeInBytes: Long = sqlContext.conf.defaultSizeInBytes

 def needConversion: Boolean = true
}

As you could see here, it has two methods sqlContext and schema, which needs to be taken at the extension of this abstract class (by using the constructor).

TableScan, PrunedScan, PrunedFilteredScan

These traits (similar to an interface in Java) are responsible in creating the RDD from the underlying datasource. You can find the code here. For an example, TableScan & PrunedScan looks like this


@DeveloperApi
trait TableScan {
 def buildScan(): RDD[Row]
}

@DeveloperApi
trait PrunedScan {
 def buildScan(requiredColumns: Array[String]): RDD[Row]
}

A further clarification, as you could see here, buildScan method in the TableScan is used to create a table (RDD) while pruned scan creates the RDD from the given columns.

So, as I mentioned earlier, a custom relation should implement this BaseRelation and one or more of these scans. This fulfills requirements of a schema and an RDD for Spark runtime to create a Dataframe.

RelationProvider, SchemaRelationProvider, CreatableRelationProvider

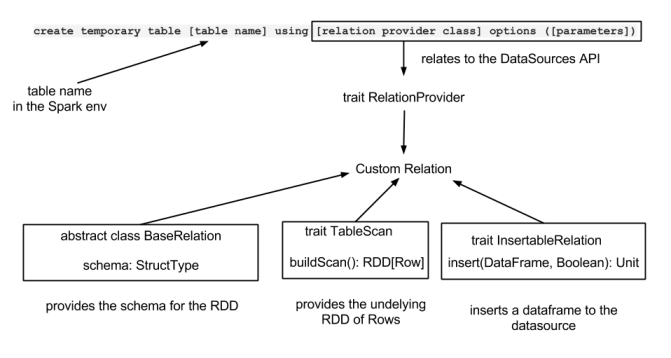
Once we have a concrete relation implementation, we are in a position to create a relation from a ‘CREATE TEMPORARY TABLE’ query. This is done by implementing the RelationProvider trait.

trait RelationProvider {

 def createRelation(sqlContext: SQLContext, parameters: Map[String, String]): BaseRelation
}

CREATE TEMPORARY TABLE query syntax looks like this

create temporary table [table name] using [relation provider class] options ([parameters]);  

Therefore, when you run this query in Spark SQL, it would send a map of parameters and the SQL context object to the given relation class (which should implement the RelationProvider trait) so that it could create a BaseRelation

InsertableRelation

So far, we discussed relations and relation providers to scan a table. InsertableRelation is where you could push data into a given data source. Find the code here.

@DeveloperApi
trait InsertableRelation {
 def insert(data: DataFrame, overwrite: Boolean): Unit
}

This InsertableRelation is coupled with the INSERT INTO/OVERWRITE TABLE queries. When you run such a query, the resultant dataframe of the query will be passed on to this relation, together with a boolean flag which indicates if it requires overwriting.

An overview of the API is depicted in the following image

spark datasources API

We saw here now, that Spark Datasources API provides a very simple set of APIs which could be used to connect Spark to an outside data source.

In the next post I will explain to you how WSO2 DAS used this API to connect to the DAS Data Access Layer. The above concepts will be much more clear when you see the implementation.

best!

Using the Carbon Spark JDBC Connector for WSO2 DAS – Part 1

As I have mentioned in my previous blog posts, WSO2 Data Analytics Server (DAS) 3.0 release uses Apache Spark as its analytic engine and Spark SQL as its query language. Apache Spark currently ships a JDBC connector which can be used to connect to external databases. While using this connector in the WSO2 Carbon environment, we encountered some limitations and to alleviate these limitations, we came up with a custom JDBC connector. This blog post describes how to use this new JDBC connector

Spark JDBC 

The existing Spark JDBC can be accessed in Spark SQL as follows.

CREATE TEMPORARY TABLE jdbcTable
USING org.apache.spark.sql.jdbc
OPTIONS (
  url "jdbc:postgresql:dbserver",
  dbtable "schema.tablename"
)

It has the following options

  • URL of the datasource
  • Database table name
  • Database driver name
  • Partition information (partitionColumn, lowerBound, upperBound, numPartitions)

Find more in the Spark Docs

Limitations of the existing Spark JDBC

In the current Spark JDBC we encountered some limitations.

  1. “user”, “password” options did not work as intended. Hence it has to be given inline with the URL. Nevertheless, putting username and password in plain text in a query is not a desirable approach. In the Carbon context, these datasources are loaded in the server start up using the analytics-datasources.xml ( you can find it in <DAS_home>/ repository/conf/datasources/analytics-datasources.xml ). Therefore the most suitable approach is to use this data source.
  2. In the Spark JDBC implementation it uses the following query to check if the table exists. It uses the “LIMIT” function, and it is not supported in some database implementations.
SELECT 1 FROM $table LIMIT 1

3.  (Not a limitation per say) Different databases use different types for the same data type, for example, for String type       certain databases use text, certain databases use varchar. So, these custom dialects should be added to Spark, as shown here.

NEW Carbon Spark JDBC

To tackle these limitations, we came up with our own JDBC connector to be used in the Carbon environment. This is very much similar to the Spark JDBC but as mentioned above, it uses the facilities available in WSO2 DAS to alleviate the above limitations.

It is expected to be tested against the following databases

  • MySQL
  • H2
  • MS SQL
  • DB2
  • PostGres
  • Oracle

How to use the Carbon Spark JDBC

Carbon Spark JDBC can be accessed using the “CarbonJDBC” shorthand string. As of the initial release, it has the following options.

  • Datasource name – this is the datasource name as per the analytics-datasources.xml
  • Table Name
  • Partition information (partitionColumn, lowerBound, upperBound, numPartitions) – this was inherited from the Spark JDBC

The sample query syntax is as follows.

create temporary table <temp_table> using CarbonJDBC options (dataSource "<datasource name>", tableName "<table name>");  
select * from <temp_table>;
insert into / overwrite table <temp_table> <some select statement>;

This connector has successfully dealt with the first limitation of the Spark JDBC and work is still progress with the second and third limitations (Please refer above)

Current limitations of the Carbon Spark JDBC 

As of now, we have identified the following limitations of the Carbon Spark JDBC and we are working on resolving them as soon as possible.

  • When creating a temporary table, it should already be created in the underlying datasource.
  • “insert overwrite table” deletes the existing table and creates it again. This may not be the most ideal approach to overwrite a table and we are working on an alternative.

WARNING: DRAGONS AHEAD! 

Carbon Spark JDBC Under-the-hood

For the reference of devs, I will explain here how we came created the Carbon Spark JDBC.

We used the existing Carbon Spark JDBC as the boiler plate code for it. You can find the Spark code here and the Carbon Analytics code here.

The flow 

The flow of creating and querying a table from this connector is as follows.

  • Query is received at the back-end.
  • SparkAnalyticsExecutor class receives a query from the WSO2 DAS Spark Console or from a Spark Script. It decodes the “CarbonJDBC” shorthand string and attaches the corresponding Relation Provider class, i.e. org.apache.spark.sql.jdbc.carbon.AnalyticsJDBCRelationProvider
  • The query is passed on to the Spark server
  • From the Spark server, it instantiates the AnalyticsJDBCRelationProvider class, which creates a org.apache.spark.sql.jdbc.carbon.JDBCRelation with the given parameters.
  • In the JDBCRelation, it creates a org.apache.spark.sql.jdbc.JDBCRDD object which can connect to the underlying datasource.
  • Once a JDBCRDD is created, data residing in the said datasources can be queried.
  • In the process of creating this JDBCRDD, Spark checks the JDBC URL of the datasoruce and adds the corresponding dialects to the query

AnalyticsDatasourceWrapper object 

org.wso2.carbon.analytics.spark.core.sources.AnalyticsDatasourceWrapper is the class responsible in creating a connection between the datasource and Spark Environment. It is as follows

public class AnalyticsDatasourceWrapper implements Serializable{

 private static final long serialVersionUID = 8861289441809536781L;

 private String dsName;

 public AnalyticsDatasourceWrapper(String dsName) {
 this.dsName = dsName;
 }

 public Connection getConnection() throws DataSourceException, SQLException {
 return ((DataSource)GenericUtils.loadGlobalDataSource(this.dsName)).getConnection();
 }
}

It uses the org.wso2.carbon.analytics.datasource.core.util.GenericUtils methods to connect to get a javax.sql.DataSource object.

It is important here to note that AnalyticsDatasourceWrapper class needs to be serializable. Whenever Spark requires a connection to a datasource, it passes a getConnection anonymous function to that particular method. We could have passed the method “(DataSource)GenericUtils.loadGlobalDataSource(this.dsName)).getConnection()” as this function. What happens then is, this Datasource / Connection object needs to be serialized all over the cluster, but a Datasource/Connection objects are not serializable by design. Therefore Spark execution fails with a “Task not serializable” exception. In order to address this issue, we wrapped this getConnection function with a serializable class.

Overcoming limitations

In this connector, the ‘table exists’ method can be found in the JdbcUtils class. Here, the “SELECT 1 FROM $table LIMIT 1” query can easily be changed to use a custom check table query from the rdbms-query-config.xml located in <DAS_home>/repository/conf/analytics/rdbms-query-config.xml

What’s on the roadmap?

Carbon Spark JDBC is now being tested. Any bug fixes and resolutions for the above mentioned limitations will soon be available. Once this is completed, I will bring you the part 2 of this post, with a ready-made example

cheers

”I’ve Lived 30 Years in These 30 Days” Touching words by Sheryl Sandberg, wife of Dave Goldberg.

I could not help but share this post from Sheryl Sandberg, the wife of Dave Goldberg who passed away a month ago while on a vacation in Mexico.

It felt very personal, because I am also going through a similar phase since my father passed away one and half months ago! So, I thought of sharing it with everybody!

Today is the end of sheloshim for my beloved husband—the first thirty days. Judaism calls for a period of intense mourning known as shiva that lasts seven days after a loved one is buried. After shiva, most normal activities can be resumed, but it is the end of sheloshim that marks the completion of religious mourning for a spouse.

A childhood friend of mine who is now a rabbi recently told me that the most powerful one-line prayer he has ever read is: “Let me not die while I am still alive.” I would have never understood that prayer before losing Dave. Now I do.

I think when tragedy occurs, it presents a choice. You can give in to the void, the emptiness that fills your heart, your lungs, constricts your ability to think or even breathe. Or you can try to find meaning. These past thirty days, I have spent many of my moments lost in that void. And I know that many future moments will be consumed by the vast emptiness as well.

But when I can, I want to choose life and meaning.

And this is why I am writing: to mark the end of sheloshim and to give back some of what others have given to me. While the experience of grief is profoundly personal, the bravery of those who have shared their own experiences has helped pull me through. Some who opened their hearts were my closest friends. Others were total strangers who have shared wisdom and advice publicly. So I am sharing what I have learned in the hope that it helps someone else. In the hope that there can be some meaning from this tragedy.

I have lived thirty years in these thirty days. I am thirty years sadder. I feel like I am thirty years wiser.

I have gained a more profound understanding of what it is to be a mother, both through the depth of the agony I feel when my children scream and cry and from the connection my mother has to my pain. She has tried to fill the empty space in my bed, holding me each night until I cry myself to sleep. She has fought to hold back her own tears to make room for mine. She has explained to me that the anguish I am feeling is both my own and my children’s, and I understood that she was right as I saw the pain in her own eyes.

I have learned that I never really knew what to say to others in need. I think I got this all wrong before; I tried to assure people that it would be okay, thinking that hope was the most comforting thing I could offer. A friend of mine with late-stage cancer told me that the worst thing people could say to him was “It is going to be okay.” That voice in his head would scream, How do you know it is going to be okay? Do you not understand that I might die? I learned this past month what he was trying to teach me. Real empathy is sometimes not insisting that it will be okay but acknowledging that it is not. When people say to me, “You and your children will find happiness again,” my heart tells me, Yes, I believe that, but I know I will never feel pure joy again. Those who have said, “You will find a new normal, but it will never be as good” comfort me more because they know and speak the truth. Even a simple “How are you?”—almost always asked with the best of intentions—is better replaced with “How are you today?” When I am asked “How are you?” I stop myself from shouting, My husband died a month ago, how do you think I am? When I hear “How are you today?” I realize the person knows that the best I can do right now is to get through each day.

I have learned some practical stuff that matters. Although we now know that Dave died immediately, I didn’t know that in the ambulance. The trip to the hospital was unbearably slow. I still hate every car that did not move to the side, every person who cared more about arriving at their destination a few minutes earlier than making room for us to pass. I have noticed this while driving in many countries and cities. Let’s all move out of the way. Someone’s parent or partner or child might depend on it.

I have learned how ephemeral everything can feel—and maybe everything is. That whatever rug you are standing on can be pulled right out from under you with absolutely no warning. In the last thirty days, I have heard from too many women who lost a spouse and then had multiple rugs pulled out from under them. Some lack support networks and struggle alone as they face emotional distress and financial insecurity. It seems so wrong to me that we abandon these women and their families when they are in greatest need.

I have learned to ask for help—and I have learned how much help I need. Until now, I have been the older sister, the COO, the doer and the planner. I did not plan this, and when it happened, I was not capable of doing much of anything. Those closest to me took over. They planned. They arranged. They told me where to sit and reminded me to eat. They are still doing so much to support me and my children.

I have learned that resilience can be learned. Adam M. Grant taught me that three things are critical to resilience and that I can work on all three. Personalization—realizing it is not my fault. He told me to ban the word “sorry.” To tell myself over and over, This is not my fault. Permanence—remembering that I won’t feel like this forever. This will get better. Pervasiveness—this does not have to affect every area of my life; the ability to compartmentalize is healthy.

For me, starting the transition back to work has been a savior, a chance to feel useful and connected. But I quickly discovered that even those connections had changed. Many of my co-workers had a look of fear in their eyes as I approached. I knew why—they wanted to help but weren’t sure how. Should I mention it? Should I not mention it? If I mention it, what the hell do I say? I realized that to restore that closeness with my colleagues that has always been so important to me, I needed to let them in. And that meant being more open and vulnerable than I ever wanted to be. I told those I work with most closely that they could ask me their honest questions and I would answer. I also said it was okay for them to talk about how they felt. One colleague admitted she’d been driving by my house frequently, not sure if she should come in. Another said he was paralyzed when I was around, worried he might say the wrong thing. Speaking openly replaced the fear of doing and saying the wrong thing. One of my favorite cartoons of all time has an elephant in a room answering the phone, saying, “It’s the elephant.” Once I addressed the elephant, we were able to kick him out of the room.

At the same time, there are moments when I can’t let people in. I went to Portfolio Night at school where kids show their parents around the classroom to look at their work hung on the walls. So many of the parents—all of whom have been so kind—tried to make eye contact or say something they thought would be comforting. I looked down the entire time so no one could catch my eye for fear of breaking down. I hope they understood.

I have learned gratitude. Real gratitude for the things I took for granted before—like life. As heartbroken as I am, I look at my children each day and rejoice that they are alive. I appreciate every smile, every hug. I no longer take each day for granted. When a friend told me that he hates birthdays and so he was not celebrating his, I looked at him and said through tears, “Celebrate your birthday, goddammit. You are lucky to have each one.” My next birthday will be depressing as hell, but I am determined to celebrate it in my heart more than I have ever celebrated a birthday before.

I am truly grateful to the many who have offered their sympathy. A colleague told me that his wife, whom I have never met, decided to show her support by going back to school to get her degree—something she had been putting off for years. Yes! When the circumstances allow, I believe as much as ever in leaning in. And so many men—from those I know well to those I will likely never know—are honoring Dave’s life by spending more time with their families.

I can’t even express the gratitude I feel to my family and friends who have done so much and reassured me that they will continue to be there. In the brutal moments when I am overtaken by the void, when the months and years stretch out in front of me endless and empty, only their faces pull me out of the isolation and fear. My appreciation for them knows no bounds.

I was talking to one of these friends about a father-child activity that Dave is not here to do. We came up with a plan to fill in for Dave. I cried to him, “But I want Dave. I want option A.” He put his arm around me and said, “Option A is not available. So let’s just kick the shit out of option B.”

Dave, to honor your memory and raise your children as they deserve to be raised, I promise to do all I can to kick the shit out of option B. And even though sheloshim has ended, I still mourn for option A. I will always mourn for option A. As Bono sang, “There is no end to grief . . . and there is no end to love.” I love you, Dave.

Quoted from her original Facebook post